
Since day 1 I have loved the Synology line of NAS products. Its so much more than a Network Attached Storage. The company has released packages that can be easily downloaded and deployed but I want it to do more.
Since discovering SugarCRM a few years ago, I had needed to install it to a linux/windows pc or as a Virtual Appliance. Since then I have found that the Synology box runs most of the components of the LAMP needed for Sugar out of the box. Some need to be enabled but thats not a big deal.
What we will be installing is the SugarCRM Community Edition (open source) which is 100% free.
So how is it done? Here we go....
The platform:
Synology DS209 (firmware version 3.0 1337)2x WD Caviar Black 750GB in RAID 1
1Gbps CAT6 link to the network
APC Back-UPS RS 1500 connected via USB
SugarCRM Community Edition v6.1.0 beta4
Disclaimer--I, nor F1 Networx Inc. are responsible for any data loss that may occur as a result of following this procedure. Back-up your data before you proceed. Do not attempt if you don't understand what you are doing.
STEP 1--Have a PC connected to the internet and download the latest ZIP of the SugarCRM www folder. Download it here. If the link doesn't work, use the full line-->
http://www.sugarforge.org/content/downloads/helper.php?dl=/frs/download.php/7361/SugarCE-6.1.0beta4.zip
STEP 2--Open the zip folder and extract it to a folder on your desktop. After extracting, rename the folder to "sugarcrm".
STEP 3--Now we need to login to the Synology NAS and enable the web server function.
Go to the Control Panel icon, then under Network Services, click on the Web Services icon. Then check off the Enable Web Station, and Enable MySQL.

Press OK to save the changes.
STEP 4--Now that the web site is running, it will create a new share called "web". This is the linux equivalent of the /var/www directory. We need to assign write privileges for our user. So go back to the control panel, and under:
- File Sharing and Privileges
- Click on the File Sharing icon
- Navigate to the "web" share name and click on it
- Click on the Privileges Setup button at the top
- You will now see all the users and their access rights to the share, mark off the Read/Write check box for the users that you want to have edit access to the web share.
- Press OK to save
- Close out of the control panel frame
You need to choose the model of your NAS, navigate to the bottom of the downloads where you will see phpMyAdmin Package. Download the zip file to your desktop and extract it.
STEP 6--Install the phpMyAdmin Package to the NAS. Go to the system button (see pic below), go to Package Management, click Install, click Browse, navigate to your desktop where you extracted the zip of the phpMyAdmin Package.spk file, press Next, mark off "Run after install".

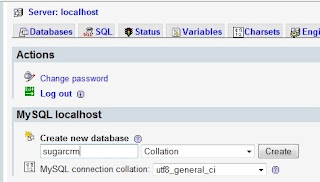
STEP 7--Create the database using phpMyAdmin link located in the URL field. See pic below.


when prompted for a login/pass, the default username is root, there is no password.
At the phpMyAdmin main screen create a database called "sugarcrm", dont change any settings for it. Now would be a good time to change the root password also.
At the phpMyAdmin main screen create a database called "sugarcrm", dont change any settings for it. Now would be a good time to change the root password also.

STEP 8--Close out of the phpMyAdmin screen and logout from the Synology admin panel. Browse the web folder share on your NAS, \\ip-of-your-synology\web
Make sure you are using an account that has read/write credentials that we set earlier.
Copy the sugarcrm folder that we extracted and renamed back in Step 2 and paste it into the web folder on your Synology NAS. After the copy completes, use your web browser and navigate to http://ip-of-your-synology/sugarcrm/install.php
That will bring you to the configuration wizard of SugarCRM. When prompted for the database password, username will be root, the password is blank unless you changed it. Where it asks for a database, type in "sugarcrm" (without the quotes). After the setup completes, you can close your web browser.
STEP 9--Login to to the SugarCRM console. Use your web browser and navigate to http://ip-of-your-nas/sugarcrm/index.php
Initially you will login with the same credentials that you use for the admin account of the admin panel of the Synology.
STEP 10--You're all set to manage your client relationships more effectively. At this point it is suggested that you add the web share and the mysql databases to your back-up routine on the Synology.
NOTES.... on my unit, the delay in page response varies from instant to a few seconds (3-4) depending on how much content and intensity of the page request. If you are doing this on a higher end unit, like a "+ series" unit or are using WD Raptors/SSD your results will likely be better. This system is very processor intensive, so the faster the better. RAM and HDD usage impacts are minimal.
Feedback is much appreciated. Thanks!!!
Until next time,
Will Kutzler
F1 Networx Inc.
http://www.f1networx.com
11 comments:
Thank you for this step by step, very usefull to me!!
Seriously Dude i am about to try this if it is as simple as you have explained it you will be considered a genius and a awesome person of the highest stature. Ill let you know how it goes.
Yeah awesome tutorial thanks for the help. Now to work out how to export from act.
Welcome all!
Exporting from ACT is best done as a CSV. It will give you the most options to control and modify the data before it gets pulled into its final system.
I dealt with ACT for several years and it was nothing short of a nightmare.
Thanks a lot !!!
Installation was easy with your steps.
Excellent tutorial, done installing 6.4 a breeze.
Thanks for these instructions! They worked great!
All set with SugarCRM on my Synology NAS. Ready to start selling ...
Thanks a lot! Helped me to make it running!
Thank you for your effort, but some things I do not understand:
You say STEP 9--Login to the SugarCRM console. Use your web browser and navigate to http://ip-of-your-nas/sugarcrm/index.php
..But you do not tell what to do next. If i doubleclick a PHP file, my NAS asks me if I want to download it..
second: If I use the installer wizard from my Synology nas, it completes all and the when I want to run the program it ends up with a page that says: page cannot be found. Apparently it looks on http://192.168.1.10 which is the IP of the NAS, but the nas is on port 5000. I guess it should look on http://ip:portnumber? or what..
The problem is I can not run the installer again to try different options, because it is not available as a separate executable.
Regards, Hans Ham
Hans,
The latest DSM version 4.2 has the SugarCRM a pre-built module in the Package Center. After you load the package, you go to http://IP-of-NAS/SugarCRM/index.php
from there it will load the setup page for the CRM module.
Be sure to have PHPAdmin package installed as well. You will need that to actually launch the PHP config.
Use either firefox or Internet Explorer with the http://IP-of-nas in the trusted or Intranet sites list.
Nice blog to read. You may like to visit authorized SugarCRM partners site which will give you the best services in usa uk canada and in your region.
SugarCRM partners usa
SugarCRM partners in nyc
Post a Comment