Search This Blog

Showing posts with label F1networx. Show all posts

Tuesday, March 10, 2015

Business Networking Tip: Create Gravity!

When going to an event or even a regular speaking engagement, wear something that is identifiable. All Pop icons have some sort of "signature" to their appearance. Steve Jobs was always seen in jeans and a turtleneck; Donald Trump has loud and bold ties; to name a few.

So how do you display your signature even in a low lit networking event? Simple; wear an attention grabbing piece of clothing. 
  • Digital Name Badge
  • Regular name badge with blinking LED
  • Bright colored piece of clothing
These garments don't have to be extravagant, just simple and easy to identify. An unusual hat, vest or tie could easily do the trick.

There are 3 main reasons to creating your gravity...
  1. It creates a presence in the crowd without saying or doing anything
  2. Easily becomes an ice breaker as on-lookers will want to know what the unique piece is about. This works especially well in getting leverage into a clique group that isn't networking, yet could be a power connection for you
  3. Most importantly, it creates an instant memory for those you've interacted with and even those that you may only have gotten their card without much discussion. When you do your follow up calls, you can jog their memory with "I was the guy wearing the flashing green name badge at XYZ Networking event" instead of "I was the guy that was about your height wearing  a suit at the event yesterday" which was about 75% of the entire room and doesn't help you stand out from the crowd.
If you are looking for an ice breaking for any network event, I highly recommenced the iDigiTag. I use one everywhere I go and its hard to not be remembered!
http://idigitag.com/video-badge/

Questions, or ideas, we love to get your feedback. 

Until next time, 

Will Kutzler
F1 Networx Inc.
New York's Premier Tech Management Group
www.f1networx.com
631-764-2600

Monday, January 26, 2015

Your Emergency Kit Is Missing This

Your Emergency Kit Is Missing This


Like most people, your Home/Auto Emergency Kit includes the necessities to ensure a basic set of safety. These days however, that kit needs a refresh. With so many of us depending on our mobile devices for communication, having a dead cellphone battery in the middle of a storm is not good.

Fortunately, its a cheap and easy fix. Get a small portable battery pack. 

This unit has a decent capacity, flashlight built in and is easy to stow away

Or if you need a larger and more durable unit that can recharge itself...
http://amzn.to/1th8jZV

The price for both of these are very reasonably priced and can get you out of a jam. Best part is that you can charge it in the car, from a laptop or other USB sources like a Cable TV Box. Keep one in the car, and another in the house.

Additionally, if you are in the Tri-State region, CVS and Staples has these units (without flashlight) for $10 or less.

On the left is the small charger, on the right is the Levin Solar unit.

Questions, feel free to contact us.


William Kutzler
F1 Networx Inc.
New York's Premier Tech Management Group
631-764-2600


Monday, January 27, 2014

Google Chromecast

While the final frontier of technology dominance has been the TV in the living room, companies very rarely make a splash. Even the hyped Apple can't crack the code, as their Apple TV turned out to be a blundering failure. Enter Google and their Chromecast. As of the last year, Google released the product called Chromecast. It isn't a set-top box or a whole TV, instead, its an HDMI device with a Wi-Fi chip in it. The entire function of this tiny widget is to bridge the content and apps from your phone, tablet and PC over to your TV. The cost is a tiny $35 and is available everywhere [Staples, Best Buy, RadioShack and all over online].

Setup is a breeze. The hardest part is connecting it to your TV, just plug it in and change the input. If its wall mounted, it can take a little longer since you aren't taking your TV off the wall to connect it quicker. Takes 5-7 minutes after you have the app installed. During the setup from your mobile device, the widget has the Wi-Fi profile configured, gets the latest firmware update and configures itself for the format of your TV.

What you need
  • TV with available HDMI and USB port
    • if you dont have USB, thats OK the kit comes with a Wall Adapter for it
  • Mobile device with access to an App Store/Google Play to download the Chromecast app
  • Wi-Fi network coverage that reaches the TV
    • the stronger the signal, the smoother the experience will be

Picture quality was outstanding, worked with my Droid Razr Maxx HD, Samsung Galaxy Note 8, Samsung Galaxy S4 without a hitch. At times, I've noticed the device doesnt want to connect, but turning the TV on/off does the trick. It could be the USB port on my TV not putting out enough power to drive the Chromecast which using the supplied AC Adapter would potentially resolve that, but I didn't want to run any wires and it happens very rarely. Netflix, YouTube, Revision 3 channels looked great on my TV in 1080p and I could multi-task on my device while the chromecast was streaming either browsing the web, looking for the next video to cast or adding something to the playback queue. All in all, easy and it doesnt require its own interface to interact with, just adds a button that lets you Cast to the TV of your choice if you have multiple Chromecasts on the same network.

All in all, I would totally recommend these. They're a steal at $35, a breeze to setup and for about $100 you can add online content to 3 TV's in your home/office without additional subscriptions.

Monday, May 21, 2012

Check Out My New Credit Card Terminal !!!

We're used to things getting smaller, but usually the price doesn't follow. That is until you look at credit card processing...

I recently got the Square Card Reader over the weekend. Like all new technology, we have to take a grain of salt with it. This product though has blown away my expectations. Since spotting this a few months back, I was waiting to take the leap, and I'm glad I did!

Here's how it works....
Using your smartphone or tablet (Android / iOS), download the Square App and connect the FREE reader which they sent by mail. Plug the reader into the headphone jack, launch the app and you now have a credit card terminal! Punch in the amount to charge, swipe the card, hit the process transaction icon, done. You can even do manual card entry. You can even issue a refund right from your transaction history register on the device!

This is all great but how much does it cost? Simple: 2.75% per transaction (3.5% + 15cents for manual entry). Thats it. No minimums, no terminal fee or merchant fees, no tiered pricing, no guessing. I LOVE IT.

So what about the receipt and signature? No worries. The receipt gets emailed or text messaged to them on the spot! And the signature is entered right on the screen with their finger or a stylus.

Process the payment over 2G, 3G, 4G or WiFi, all the data is encrypted. They adhere to the highest industry standards (PCI Level 1).

The money is transferred within 1 business day via ACH, unlike PayPal which holds it in their account until you  initiate the transfer.

So what are you waiting for? Ditch the terminals from 1990 and get Square today! Available at Radioshack and Online at https://squareup.com/

You will need the following:
  1. A Smartphone or Tablet
    • Apple device running iOS 4.1 or higher (iPad iOS 5.0+ for register version)
    • Android running 2.1 or higher 
  2. A 3.5mm headset jack with microphone (audio jack adaptors are not supported)
  3. A screen size specified as Normal or Large (Small screen sizes are not supported)
  4. GPS enabled
  5.  A data connection
This is a solid solution for anyone on the Go or even at a fixed location. They will provide you with multiple readers if you have several devices to swipe from, for free.


Tuesday, March 13, 2012

Think the "new iPad" really is cutting edge? Guess again...

The "new iPad" and the latest releases from other tablet makers like Motorola and Samsung are all flawed in one main way...the screen. Having a higher resolution (better quality picture) really only contributes to a small portion of the tablet experience.

The real advancements are to be seen in the responsiveness of the screen, not so much about what the other components are (memory, processor, and the like). A recent publication by the Microsoft Applied Sciences Group has broken the barrier into the next generation of touch screen interaction.

ALL tablets (yes, even the new iPad) all suffer from touch screens with slow response times, about 100ms (milliseconds, 1 / 1000 of a second). A true touch experience needs a screen with a response of at least 5ms. The Microsoft Lab has developed a screen that achieves 1ms! The video link at the bottom of the post demonstrates this why this is so important.

You Tube Link to Video

-Will Kutzler
F1 Networx Inc
New York's Premiere Technology Management Company
www.f1networx.com

Sunday, October 3, 2010

How To Install SugarCRM on Synology NAS

UPDATE: As of late, with the latest release of the Synology DSM 4.0, the SugarCRM is now available as an app in the Package Center which makes the entire process listed below, obsolete. Check the Synology support page to see if your NAS has a firmware update available to it for DSM 4. Same rules apply though, the higher end unit you have, the better the performance will be.

Since day 1 I have loved the Synology line of NAS products. Its so much more than a Network Attached Storage. The company has released packages that can be easily downloaded and deployed but I want it to do more.

Since discovering SugarCRM a few years ago, I had needed to install it to a linux/windows pc or as a Virtual Appliance. Since then I have found that the Synology box runs most of the components of the LAMP needed for Sugar out of the box. Some need to be enabled but thats not a big deal.

What we will be installing is the SugarCRM Community Edition (open source) which is 100% free.

So how is it done? Here we go....
The platform:

Synology DS209 (firmware version 3.0 1337)
2x WD Caviar Black 750GB in RAID 1
1Gbps CAT6 link to the network
APC Back-UPS RS 1500 connected via USB

SugarCRM Community Edition v6.1.0 beta4

Disclaimer--I, nor F1 Networx Inc. are responsible for any data loss that may occur as a result of following this procedure. Back-up your data before you proceed. Do not attempt if you don't understand what you are doing.

STEP 1--Have a PC connected to the internet and download the latest ZIP of the SugarCRM www folder. Download it here. If the link doesn't work, use the full line-->
http://www.sugarforge.org/content/downloads/helper.php?dl=/frs/download.php/7361/SugarCE-6.1.0beta4.zip
STEP 2--Open the zip folder and extract it to a folder on your desktop. After extracting, rename the folder to "sugarcrm".

STEP 3--Now we need to login to the Synology NAS and enable the web server function.

Go to the Control Panel icon, then under Network Services, click on the Web Services icon. Then check off the Enable Web Station, and Enable MySQL.
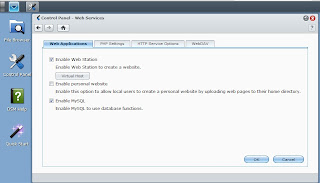
Press OK to save the changes.

STEP 4--Now that the web site is running, it will create a new share called "web". This is the linux equivalent of the /var/www directory. We need to assign write privileges for our user. So go back to the control panel, and under:
  1. File Sharing and Privileges
  2. Click on the File Sharing icon
  3. Navigate to the "web" share name and click on it
  4. Click on the Privileges Setup button at the top
  5. You will now see all the users and their access rights to the share, mark off the Read/Write check box for the users that you want to have edit access to the web share.
  6. Press OK to save
  7. Close out of the control panel frame
STEP 5--We need to install the SQL manager to setup the database. Download the SQL Manager package from the Synology website. http://www.synology.com/support/download.php
You need to choose the model of your NAS, navigate to the bottom of the downloads where you will see phpMyAdmin Package. Download the zip file to your desktop and extract it.

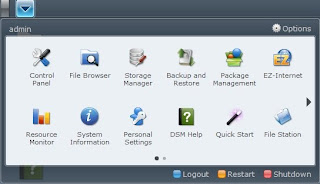
STEP 6--Install the phpMyAdmin Package to the NAS. Go to the system button (see pic below), go to Package Management, click Install, click Browse, navigate to your desktop where you extracted the zip of the phpMyAdmin Package.spk file, press Next, mark off "Run after install".


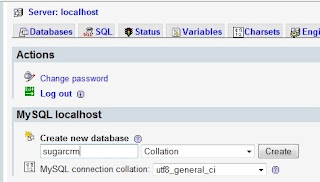
STEP 7--Create the database using phpMyAdmin link located in the URL field. See pic below.


when prompted for a login/pass, the default username is root, there is no password.

At the phpMyAdmin main screen create a database called "sugarcrm", dont change any settings for it. Now would be a good time to change the root password also.


STEP 8--Close out of the phpMyAdmin screen and logout from the Synology admin panel. Browse the web folder share on your NAS, \\ip-of-your-synology\web

Make sure you are using an account that has read/write credentials that we set earlier.

Copy the sugarcrm folder that we extracted and renamed back in Step 2 and paste it into the web folder on your Synology NAS. After the copy completes, use your web browser and navigate to http://ip-of-your-synology/sugarcrm/install.php

That will bring you to the configuration wizard of SugarCRM. When prompted for the database password, username will be root, the password is blank unless you changed it. Where it asks for a database, type in "sugarcrm" (without the quotes). After the setup completes, you can close your web browser.

STEP 9--Login to to the SugarCRM console. Use your web browser and navigate to http://ip-of-your-nas/sugarcrm/index.php

Initially you will login with the same credentials that you use for the admin account of the admin panel of the Synology.

STEP 10--You're all set to manage your client relationships more effectively. At this point it is suggested that you add the web share and the mysql databases to your back-up routine on the Synology.


NOTES.... on my unit, the delay in page response varies from instant to a few seconds (3-4) depending on how much content and intensity of the page request. If you are doing this on a higher end unit, like a "+ series" unit or are using WD Raptors/SSD your results will likely be better. This system is very processor intensive, so the faster the better. RAM and HDD usage impacts are minimal.

Feedback is much appreciated. Thanks!!!

Until next time,

Will Kutzler
F1 Networx Inc.
http://www.f1networx.com